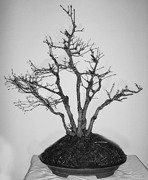
Clump Style Plantings
by Mike Coppola
There are many forms of group plantings – Forests are perhaps the most common of these along with raft or sinuous raft being the next most well known style. About 8 years ago, I was traveling on business to the Pacific Northwest and made a point of visiting with Max Braverman and Kate Bowditch from Pine Garden Bonsai in Washington state. Max’s pottery is well known in bonsai circles and I was surprised to learn of Kate’s knowledge and expertise with trees. Together they maintained a wonderful business which unfortunately is closed due to health issues. The original intent of my visit was to purchase some pots, as well as some bristlecone pines. While wandering around the nursery, I discovered some very interesting groups of Japanese maples in one gallon nursery containers. I inquired about them and was informed that they were intended to be clump style groups of Japanese maples. The basis for the group was a small flat piece of pottery (see diagram) that held the trees together during their initial growth and allowed the roots and trunks to grow together. I purchased one of these plantings and was supplied with a care sheet which described in detail the care required as well as a plan for growth.
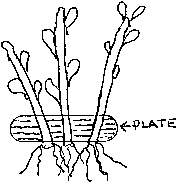
The basis for the planting is the plate like piece that has enough holes in it to hold the number of trees that you wish to have in your clump. The material in mine was pottery clay – no doubt the idea of Max in this case. However, the plate may be made of 1/4 inch plywood if you wish – although I would avoid treated wood due to the chemicals contained within the wood to preserve it. If you choose plywood I would suggest scoring the wood down about 1/8 of an inch between holes in order to allow the wood to be broken up more easily later on. Drill the number of holes you wish your clump to end up with, plus 2 extras – the extras are in place to allow for the fact that we sometimes lose seedlings when transplanting and so it is easier and safer to plant more than you need and remove them later on. My group was initially planted in a one gallon nursery pot and came to me that way. My own preference would be to plant the group in a 10 or 12 inch bulb pan to allow more room for root and tree growth. Use regular bonsai soil and position one seedling of any variety of tree that you wish in each hole in your plate. Trim the roots and then fish them through the plate so they are on the underside of your plate, with the tree itself above the plate. Use chopsticks to work the soil in between the roots and then cover plate with a second more thin layer about 3/4 of an inch of soil – this will be the area in which new roots will form that will bond the trees together. Treat the planting as you would any other newly planted potted tree, providing protection from frost, wind and extended periods of sunlight.
Allow the trees to grow wild for the first year and then perform a fall pruning on the trees. For years two and three, allow the trees to grow and swell at the bases – this will result in the beginnings of the clump appearance we are hoping to attain. Allowing the trees to grow unchecked for 3 years should provide significant trunk and base development and for now that is our main concern. In the spring of the 4th year, we will need to repot the planting and remove our plate. First remove the soil and cut the root ball back to a manageable size. At this point you may do one of two things – you may choose to remove all the roots below the plate ( provided of course that you have enough roots above the plate to support your group) or you may be able to carefully remove the plate with minor damage to the surrounding roots. In either event you must remove the plate, so locate your plate within the root ball. Next, using 2 pairs of regular pliers, grab a hold of sections of the board and twist and turn, to cause them to break apart – this is where scoring the board prior to planting should ease this task. Repeat this procedure until all pieces of the plate have been removed. I had to fight with chunks of ceramic pottery with my planting, which was not an easy task. I think the board would provide the same support and yet between the scoring prior to planting and rotting due to watering of your clump, it should be easier to break apart and remove. Repot the group in fresh soil using a bulb pan or larger pot. At this time remove any large unsightly branches that contributed to the growth of the bases and are not needed in your design. From here on in you may begin to style your group if you wish. I allowed another season of unchecked growth to allow the trees to grow together and increase the trunk girth even more and then began my styling efforts.
At this time, you may decide where the front of your design is, how many trees you wish to keep in the design and so on. Remember that odd numbers of trees - 3, 5, or 7 are good, while even numbers such as 2, 4, or 6 are not. Keep in mind that the individual trees are not so important as individual trees but rather for their contribution to the overall design. Therefore, you must select one tree as your main tree – the tree may be in the front or rear of the composition. The other trees around it will support and compliment the design. I found this approach to work well for Japanese maples but cannot see any reason why you could not use Trident maples, Chinese Elms or Korean Hornbeams for your tree material. The important thing is to have holes in your plate large enough to allow the seedling’s trimmed roots to pass through and yet small enough to hold up your seedlings. I am very pleased with the results and look forward to refining my clump of Japanese maples. I repoted them again this season and put them in a shallow oval container, raising the group up in the pot and allow the bases and roots of the group to be seen as a focal point and admired.